Radiating good health
There was a time when most bike engines relied on a steady breeze to keep them cool.
Of course, ‘cool’ is a relative term and when you are stuck in traffic on a 38 degree day, as you sit astride your bike slowly baking, you get a pretty good idea of what can happen to an engine when there is no cool breeze. So thank progress for liquid cooling.
Let’s take a quick look at the bare basics of keeping an eye on the liquid cooling system your engine relies on. The system on most bikes is pretty reliable, but checking its components now and then can help you avoid any nasty surprises.
Warning – don’t get burned
Checking over your cooling system is good harmless fun unless your engine is hot. Removing your radiator cap or tinkering with hoses on a bike that’s been running recently is a fast track to a hospital burns unit. So don’t be stupid.
Not water cooling – liquid cooling!
Let’s get one thing clear right up front, just in case you should ever be tempted to run to the nearest tap when it comes to a cooling system top-up; plain old water is NOT good for your bike’s cooling system! Tap water is crap water inside an engine, slowly corroding away at your components, creating scale and generally causing havoc. And before you go reaching for the demineralized or distilled water, be aware that the delicate (expensive!) rubber and synthetic seals inside your engine will suffer if you use it. Only coolant has corrosion inhibitors that protect internal metal parts and conditioners that preserve the various seals. Water is cheaper in the short term but will cost you dearly over time, so forget it.
Count your components
Just in case you’re new to all of this, the key components of a motorcycle liquid cooling system that any owner can check and inspect generally comprise:
- Radiator and cap
- Fan
- Various hoses and connections
- Header tank
Your radiator – it’s tough up front
Poor radiator. Being up front in the airflow also means being a target for rocks, sticks, grit, insects and anything else the road can throw at you. Regularly cleaning your radiator with a bucket of water and a soft brush is a good idea, but be gentle. Modern motorcycle radiators feature soft, lightweight aluminium cooling fins that respond very badly to rough handling. Even a powerful water hose can damage them, so take it easy. Clean your radiator gently. If you notice bent or flattened cooling fins – and you will – you can gently straighten them with patience and a toothpick or any small tool that’s softer than aluminium. Bent cooling fins reduce the efficiency of your radiator and a unit that’s seen some action can really suffer, so invest some time and sort it out.


Do you have enough coolant onboard? If your bike is completely cold, unscrew the radiator cap to check – can you see coolant? If not, you need a top-up. Consult your owner’s manual to be sure you’re using the right type, then carefully fill the radiator to capacity. If you overfill just a bit, don’t panic – the excess will generally run off into the overflow tank or onto your shoes. When the radiator is full, replace the cap, being careful to push it down and lock it properly in place. It’d be a bit ironic if you didn’t do it right and cooked your engine for the sake of checking your coolant, wouldn’t it?
Cap, clamps and hoses
Unless you can see evidence of leaks, your radiator cap is most likely fine. Caps are rated for pressure, so if you suspect any problems, contact a workshop – it’s not worth taking chances with a bad radiator cap because coolant loss can cost you a seized engine.
Most motorcycle cooling systems have at least two – and often more – large diameter main hoses leading from the radiator to and from the pump. Check that the clamps are snugly fastened and look for any wet or crusty deposits around the hose ends. Are the hoses soft and pliable? Hardened hoses are at the end of their life and should be replaced.
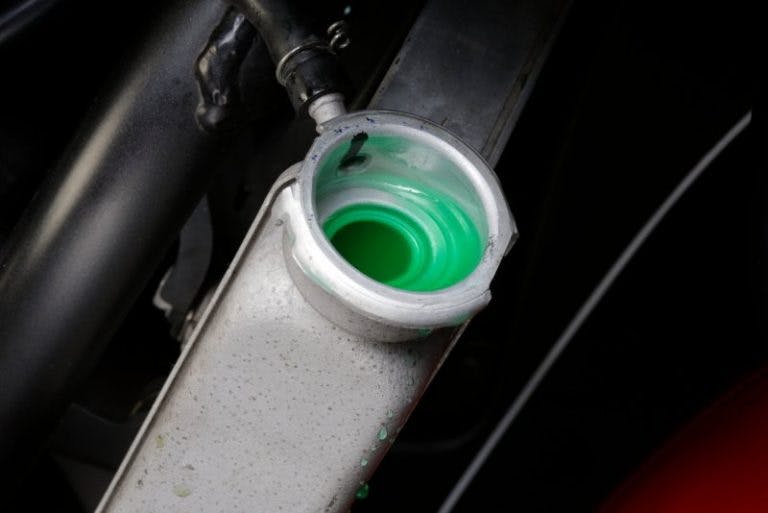
Header tank
Most bikes have a header or ‘overflow’ tank hidden away somewhere under a side panel or perhaps under the seat. Depending on running temperature, your bike will vent excess coolant into this tank and then draw it back into the system as it cools, so it’s important that it is filled to the right level. The minimum and maximum levels are generally marked clearly on the tank, which is usually made from translucent plastic so you can see the coolant inside. With the bike cold, check that the level is correct and if it’s low, top it up with fresh coolant – there’s usually a soft rubber cap at the top of the tank. There will be small diameter rubber hoses leading in and out of the tank – check that these are soft, pliable and sealing at the ends. Your coolant should be clean and bright green. If its not, it’s time to talk to your workshop about a cooling system flush and refill.

Summing up - stay cool
There’s no big trick to keeping an eye on your cooling system components in between services, caring for your radiator and checking for leaks. But be aware that a catastrophic leak and a moment of inattention can lead to a cooked engine and a big repair bill, so don’t take chances. Keep an eye on things, and if you think you’ve spotted a problem, talk to a pro and get it fixed with genuine parts.
Until next time, enjoy the ride!
Click here to read Chapter 11 - Bearing with it all.


